Thursday, March 28, 2019

CAS(E) this Sketch #315


Former teammie Nathalie brings us this week's CAS(E) this Sketch #315.


And here's my take on it.


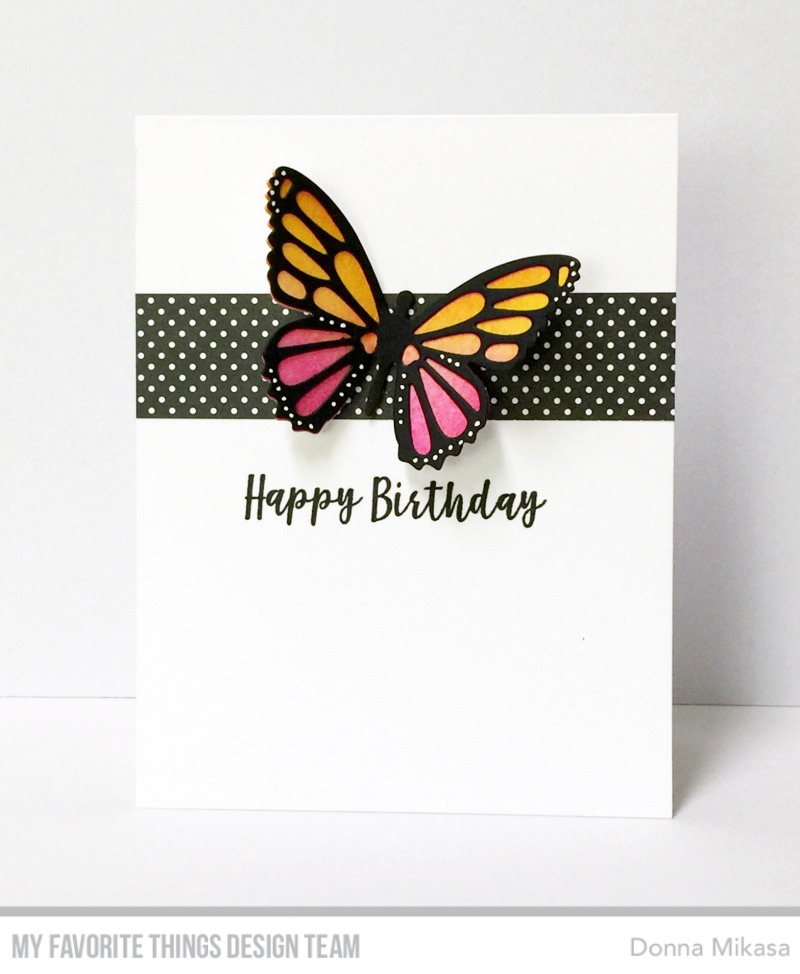
A butterfly, a strip of patterned paper and a sentiment. Doesn't get more 
literal than that. I was planning to substitute the butterfly in the sketch,
but when I saw this dotted one in my stash, I decided to pair her with the
dotted paper.
 
Serendipitous? Or lazy? I think the latter. 😉 And because I want to keep you
a bit longer, here's another version (thanks to some UnDu) where I tilted the
butterfly for a bit of interest. 


Visit CAS(E) this Sketch to see how the rest of my teammates interpreted
the sketch and join us if you can. Link up your card(s) by Thursday, April 4th
and we hope to see you in the gallery!


Wednesday, March 27, 2019

MFT Wed Sketch Challenge #430


Are you ready for this week's MFT Wednesday Sketch Challenge?
Meet Sketch #430.


And here's my take on it.


I adhered a strip of dotted paper on a kraft card base, popped up three 
ducklings, and finished off the card with the white embossed sentiment.
How cute are those ducklings?


Visit the Card Challenges blog for all the details on how you can be the random
winner of a $50 MFT gift voucher when you enter the challenge.
Hope to see you in the gallery!


Tuesday, March 26, 2019

MFT Treat Bag Topper Kit Release Day


It's time! The Treat Bag Topper Kit is ready to purchase in the MFT Store!

I have one more project to share with you, using Stacey Yacula's Easter Bunnies
and the flat treat bags found in the kit.


I stamped and colored images from the Easter Bunnies set and cut them out with the
matching Die-namics. Kraft card stock was stamped with the dot background stamp in
white pigment ink, then cut with the topper Die-namics.

Green card stock was cut twice--once with the topper die, then a second time with
the grassy edges. The grass was adhered to the topper to ground the bunny.


A flat treat bag was filled with Easter grass and jelly beans, then stapled closed.
The topper was adhered to the bag with double stick tape. A stamped sentiment
banner was adhered to the topper, then finished off with the images.


And as a reminder, the "free with $60" Die-namics during the Kit Release
is Gifty Greetings. I die cut the "For You" sentiment on the bottom of the
topper piece and backed it with dark gray card stock.

After inking up a rainbow, I removed the largest arches and adhered it
to the handle, together with some clouds.

We hope you've been inspired by all the Kit projects and will grab yours before 
it sells out. And be sure to use #mftstamps when you share your projects on 
social media. Happy shopping!


Monday, March 25, 2019

MFT Treat Bag Topper Kit Day 2


Are you ready for more Treat Bag Topper inspiration? This super fun kit
will go on sale tomorrow, March 26th at 10AM EST in the MFT Store!

For today's project, I made some favors for an ocean themed birthday party.
All products that are part of the kit are shown in boldface type.


The Treat Bag Topper was cut from Summer Splash card stock and waves were stenciled
on the front.  The sentiment was stamped on top and plants were stamped on the bottom
with white pigment ink.


Assorted fish were white embossed on watercolor card stock, then colored with
Distress inks and daubers before cutting them out with the matching Die-namics.


Three flat treat bags were filled with Goldfish crackers and I managed to
seal them with a FoodSaver®. The topper was adhered to the bag with double
sided tape, and the fish were adhered to them and finished off with sequins.

Visit today's Kit Countdown post for more inspiration and get ready to
purchase your Treat Bag Topper Kit tomorrow. Thanks for stopping by!


Sunday, March 24, 2019

MFT Treat Bag Topper Kit Day 1


This month instead of a Card Kit, we're bringing you an innovative and super fun kit--
Treat Bag Topper. If you've ever wanted to dress up a goodie bag for any occasion,
then we've got you covered!

Here's a peek at the kit. For a closer look and detailed description of the kit's contents,
visit today's Countdown post at My Favorite Things.


The bag topper die is the brainchild of teammate Karolyn who shared a DIY version
 earlier this year.  MFT has turned it into a brand new Die-namics that will have you
cranking out toppers for all your treat bag projects.

Today I'm sharing a treat bag using Cottontail Cutie--just in time for Easter.
All products that are part of the kit are shown in boldface type.


Itsy Bitsy Polka Dots Background was stamped on a piece of Razzle Berry
card stock with Sweet Tooth pigment ink, then cut with the topper Die-namics.
Cottontail Cutie was cut from white card stock and the eyes, ears, nose and
mouth were colored with Copic markers.


A gusseted treat bag was filled with Easter grass and jellybeans, then folded
down and stapled. The topper was adhered to the bag with double stick tape
then finished off with the bunny's head and paws.

Visit today's Kit Countdown post for more inspiration from participating
Creative Team members and leave a comment there for a chance to win a prize.
Then get ready to purchase this fun kit on Tuesday, Mar 26th at 10AM EST
in the MFT Store !


Saturday, March 23, 2019

Everything's Rosy at Sunny Studio Stamps


Mendi of Sunny Studio Stamps invited me to guest design using products from their
 Spring 2019 Release and I eagerly accepted the invitation.

I chose to work with the Everything's Rosy stamp set and I'll have to admit to being
a tad nervous about layering them. But, I was pleasantly surprised at how easy it was
thanks to the helpful Layering Guide and my Misti. 


I tried different color combinations and stamped enough blooms and leaves to make
two cards. Please visit the Sunny Studio Stamps blog for the full reveal of both cards
and I share the ink colors that I used for each card.

Thanks so much for stopping by and big thanks to Mendi for inviting me to
guest at Sunny Studio again!


Friday, March 22, 2019

March CAS Christmas Challenge--Deer


It's my first time playing along with CAS Christmas Challenge, prompted by
my blogging friend, Hideko. I love CAS designs and when I was going through my
stash of die cuts, I found an old Maggie Holmes stag to use for the challenge.
Yes, it's a pink stag.


If I remember correctly, I gold embossed a Hero Arts stamp, then added a
quick watercolor wash over it. I die cut an extra stag and adhered it to the
colored one for some dimension.

 The stag's head was adhered to a white card base and finished off with
the gold embossed sentiment and thin white frame. I thought about adding
some small gold sequins but I wanted to keep it as CAS as possible, and I think
there's enough bling on the card as it is.
 
The best part about entering a Christmas challenge? You get a jump start
on this year's Christmas cards. Thanks for stopping by today!

* * *

Edited to add: Honored to be chosen as Outstanding Design!


https://caschristmascardchallenge.blogspot.com/2019/03/cas-christmas-march-2019-top-picks.html

Thursday, March 21, 2019

CAS(E) this Sketch #314


Chrissy brings us this week's CAS(E) this Sketch #314.


I see an ice cream cone in the sketch--do you? I almost went that route but
here's what I came up with instead.


I smooshed green Distress ink on watercolor card stock. Three kitties were
popped up over it, then finished off with the stamped sentiment.

Visit CAS(E) this Sketch to see how the rest of the team interpreted Chrissy's
sketch and join us if you can. Link up your card(s) by Thursday, March 28th 
and as the weekly winner, you'll be invited to join us on a future sketch!


MFT March Birthday Project


Rainbows are always the right choice--especially for celebratory occasions
like birthdays. MFT offers a number of options in their selection of stamps and
Die-namics that are a literal representation of this iconic image, as well as a variety
of ways to incorporate the cheery color combo.

For my project, I went with a rainbow sentiment. The Script Happy Birthday is one of
my favorites because of the fun, playful font.


A piece of watercolor card stock was inked in rainbow order then cut with the
sentiment. I die cut the sentiment once more and doubled it up for texture and
some dimension.

Confetti was stenciled on dark gray card stock with white pigment ink. The
sentiment was adhered on the card and finished off with the little pup.


Get creative this month and share your rainbow-inspired birthday projects with us!
Visit the Card Challenges blog for all the details on how you could be the random
winner of a $50 MFT gift voucher. Hope to see you in the gallery!


Wednesday, March 20, 2019

MFT Wed Sketch Challenge #429


Are you ready for this week's MFT Wednesday Sketch Challenge?
Here's Sketch #429.


Here's my take on the sketch. Can you say "literal"??


Triangles were cut from a piece of alcohol ink and foil background then arranged
on a black card base. The sentiment was gold embossed and the card was finished
off with gold sequins.


Do you think that the black card base too much? I used some Un-Du adhesive 
remover to remove the triangles and adhered them to a Grout Gray card base.
A little easier on the eyes, no?


Now it's your turn. Visit the Card Challenges blog for all the details on how
you can be the random winner of a $50 MFT gift voucher when you enter the challenge.
Thanks for stopping by today!