Thursday, September 27, 2018

CAS(E) this Sketch #291


It's Thursday--time for a new CAS(E) this Sketch.
Here's Sketch #291 brought to you by Nathalie.


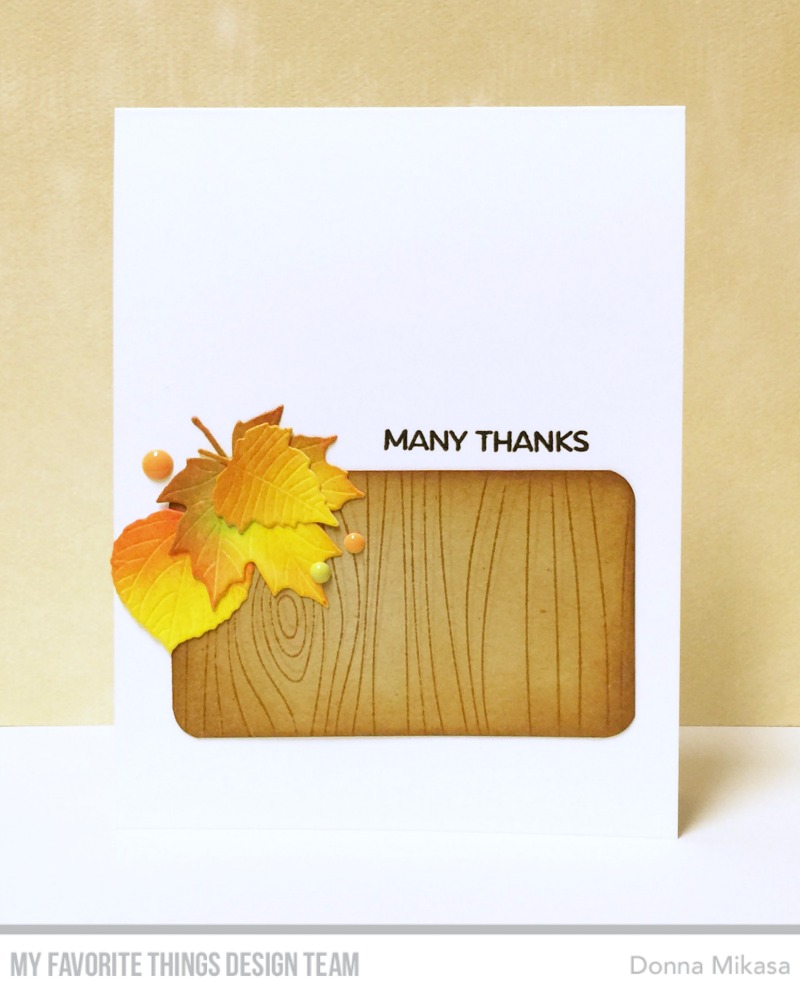
And here's my take on the sketch.


Three cups were ink distressed and spattered with water, then adhered to a
white card base. The sentiment was white embossed on a strip of black card
stock and adhered to the card, then finished off with enamel dots.

Visit CAS(E) this Sketch to see how the rest of the team interpreted the
sketch and join us if you can. Link up your card(s) by Thursday, October 4th
and as the weekly winner, you'll be invited to guest with us on a future sketch!


Wednesday, September 26, 2018

MFT Wednesday Sketch Challenge #404


Are you ready for this week's MFT Wednesday Sketch Challenge?
Here's Sketch #404.


Here's my take on the sketch.


The Drifts & Hills Stencil was inked on watercolor card stock and spattered
with water, then trimmed per the sketch and adhered to a white card base. Two fish
were stamped, colored with Copics and cut with the matching Die-namics, then
popped up on the panel. I stamped some bubbles and added the white embossed
sentiment on a Blueberry banner. Sequins finished off the card.


Get all the details over at the Card Challenges blog on how you can be the random
winner of a $50 MFT gift voucher! Come and join the challenge and we hope to see
you in the gallery!


Tuesday, September 25, 2018

MFT Filled with Joy Card Kit Release


It's time! Let the holiday cardmaking begin!
You may now purchase the Filled with Joy Card Kit in the MFT Store!

Before you run off to grab your kit, I have one more project to share with you,
using non traditional holiday colors.


Drifts and Hills Stencil was used to create a pattern on watercolor card stock
with Distress inks, then spattered with water. JOY and a snowflake were cut
from Smooth White card stock, then adhered to the panel. The white embossed
sentiment finished off the card.


As part of the Card Kit launch celebration, you can be the random winner of a $50 
MFT gift voucher by leaving a comment on participating team members' blogs by the
end of the day on Thursday, September 27th. We hope you enjoy the Filled with Joy 
Card Kit and don't forget to use the hashtag #mftstamps whenever you share your MFT
projects on social media. Happy shopping!


Monday, September 24, 2018

MFT Filled with Joy Card Kit Day 2


It's Day 2 of My Favorite Things Card Kit Countown. The Filled with Joy Card Kit
will go on sale tomorrow, September 25th at 10AM EST in the MFT Store!


I went totally literal after seeing one of the sentiments in the kit and created
an abstract globe with Distress inks on a circle of watercolor card stock.
JOY and a snowflake were cut from silver glitter card stock and I substituted
the snowflake for the "O" in JOY.


The second part of the sentiment was silver embossed on the globe, which was
adhered to a Smooth White card base. Sparkling Clear sequins finished off the card.

Visit today's Card Kit countdown post for more inspiration from participating team
members, and leave a comment there to win a prize. Hope you'll stop by tomorrow
for Release Day!


Sunday, September 23, 2018

MFT Filled with Joy Card Kit Day 1


Meet this month's My Favorite Things Card Kit that will give you a jump start on
your holiday cardmaking. This fun, colorful kit will go on sale Tuesday, September 25th
at 10AM EST in the MFT Store!

Here's a peek at the Filled with JOY Card Kit.


Visit today's Card Kit post at My Favorite Things for a closer look and a detailed description
of the kit's contents.

Here's my project for today. All products found in the kit are designated in bold type.


In the kit, there are many elements that can substitute for the "O" in JOY. For my
first project, I chose the dapper snowman. You can use the card stock in the kit to
piece together the snowman, but I chose to use Smooth White card stock and ink
distress or color the pieces myself.


Blush was added to the snowman's cheeks with a Copic marker and stripes were
added to his scarf with a white Gelly Roll pen. A panel was cut with the Wonky
Rectangle dies and adhered to a white card base. The snowman and sentiment  were
added to the card and the sentiment stamped above them. Sparkling Clear confetti
finished off the card.

Visit today's Card Kit post for more inspiration from participating team members
and leave a comment there to win a prize. See you tomorrow for Day 2 of the Countdown!


Thursday, September 20, 2018

CAS(E) this Sketch #290


Chrissy brings us this week's CAS(E) this Sketch #290.


So many possibilities with this sketch! Here's my take on it--a little peekin' pig!


The piggy was stamped with Worn Lipstick Distress ink and colored with Copics
then cut with the matching Die-namics. The English Brick Wall was stenciled with
dark gray ink then trimmed and adhered to a white card base. A strip of grass was
adhered to the bottom and the pig was popped up on the wall. The card was finished
off with the sentiment.

Stop by CAS(E) this Sketch to see how the rest of the team interpreted Chrissy's sketch
and join us if you can. Link up your card(s) by Thursday, September 27th and as the
weekly winner you'll be invited to join us on a future sketch!


Thursday, September 13, 2018

Essentials by Ellen August Essentials Challenge--Alcohol Inks


When I saw that the Essentials by Ellen August Challenge was to use alcohol inks,
I couldn't pass up the chance to join the inky fun.


https://www.ellenhutson.com/august-essentials-challenge


I was inspired by Giovanna's card to heat emboss an image on an alcohol ink background.


Mondo Hydrangea--my favorite mondo bloom--was gold embossed on an alcohol inked
piece, along with leaves on a green alcohol inked piece. I've heard that you shouldn't
heat emboss Yupo paper because of its synthetic properties, and I've heat embossed
sentiments on a card before with no problem.

This time, because of the surface area, there was some warping--especially with the
leaves--even though I was trying to keep the heat gun constantly moving.


At first I thought about doing the leaves again, but decided to leave them because I liked
the way they curled and I don't think I could have done it otherwise.

Thanks for stopping by!

CAS(E) this Sketch #289


CAS(E) this Sketch #289 is a retro one from former teammie Karolyn.


Here's my take back in, wow....2013?


And here's this week's autumnal take.


Whimsical Woodgrain was stamped on kraft card stock and trimmed to a
rectangular shape. All four corners were rounded off and the piece was ink
distressed around the edges then adhered to a white card base. Three leaves
were cut from watercolor card stock and ink distressed, then adhered to
the woodgrain piece. The sentiment was stamped on the card and finished off
with enamel dots.

Visit CAS(E) this Sketch to see how the rest of the team interpreted the sketch
and join us if you can. Link up your card(s) by Thursday, September 20th and
as the weekly winner, you'll be invited to guest with us on a future sketch!


Wednesday, September 12, 2018

MFT Wednesday Sketch Challenge #402


Here's this week's Wednesday Sketch Challenge #402.


And here's my take on it.


Itsy Bitsy Polka Dots was stamped with Distress ink on Grout Gray card stock.
The Moroccan Mosaic Stencil was placed on an alcohol ink background and
tapped with ink blending solution to remove the color.

I trimmed out a rectangle from the alcohol ink piece and adhered it to the
card base. The sentiment was gold embossed on a strip of black card stock and
adhered to the card, then finished off with sequins.


Visit the Card Challenges blog for all the details on how you can be the random
winner of a $50 MFT gift voucher!


Tuesday, September 11, 2018

MFT & Friends--September 2018 Release


It's time for this month's MFT & Friends when the Creative Team--and guests!--
share fresh ideas and more inspiration with the current release.

My project uses the new Circle Trio Shaker Window & Frame Die-namics (say that
five times, quickly!) for a faux shaker card.


I adhered a sheet of the new Black and White Dots Patterned Paper on white card stock
then trimmed it smaller with a rectangle die. The three circles were cut through the
panel and I marked off the circles underneath so I knew where to ink distress the
background of each circle.

Three ghosts from Birdie Brown's Fab-BOO-lous Friends were stamped, colored with
Copics and cut with the matching Die-namics and adhered behind each circle.


The ghosts were adhered on the background, peeking through their respective openings. 
I added black frames over each circle and adhered clear sequins beside each ghost. The
sentiment was silver embossed on a sentiment strip and popped up on the card.

Head over to today's MFT & Friends post for more inspiration and ideas using 
MFT's September Release, and be amazed! Thanks for stopping by today!


Thursday, September 6, 2018

CAS(E) this Sketch #288


It's time for a new CAS(E) this Sketch
Here's Sketch #288, compliments of yours truly.


And here's how I interpreted the sketch.


I cut a piece of polka dot patterned paper, rounded off the corners and adhered
it to a white card base. An ink distressed butterfly was adhered to the card and
finished off with the white embossed sentiment.

Visit CAS(E) this Sketch to see how the rest of the team interpreted the sketch
and join us if you can. Link up your card(s) by Thursday, September 13th and
as the winner, you'll be invited to join us on a future sketch!