Showing posts with label Hits & Highlights. Show all posts

Tuesday, December 31, 2019

MFT December 2019 Hits & Highlights--Putttin' on the Glitz


For this month's Hits and Highlights, we're ringing in the New Year--and a brand 
new decade--with glamorous looks that feature lots of shimmer and shine!


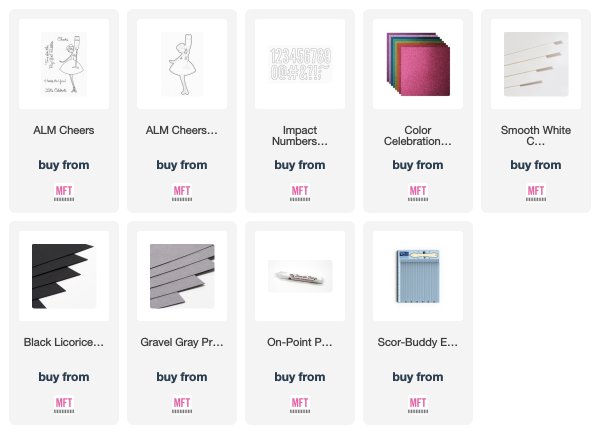
The numbers were cut from glitter card stock in rainbow colors, and stars were cut from
silver glitter card stock. I colored the ala mode girl in neutral tones and added some
sparkle to the champagne with a Wink of Stella pen.


The girl and numbers were adhered to a black panel, together with the stars and the
silver embossed sentiment. I adhered the panel to a dark gray card base and finished off
the card with dots from a silver pen.

* * * * *

This is my last project as a member of the MFT Creative Team. It was a fun, 4-year
ride and I was honored to be a part of it. Huge thanks to Kim, Jody, and Stephanie
for the opportunity to create and share with MFT products!


Tuesday, July 30, 2019

MFT July 2019 Hits & Highlights


This month My Favorite Things is celebrating their birthday and what better way
to do that than by keeping the party going with projects using the July Release 
and the newest Card Kit.

I love the Impact Alphabet and Impact Numbers Die-namics and when I spied one of
the new Sassy Pants Birthday Greetings 2, I knew what I was going to do. 😉


I diecut the greeting three times from white card stock and stacked and adhered each
letter to form thick chipboard letters. I also diecut them from watercolor card stock and
inked each letter in a different color then adhered each one on top.


A stitched panel was adhered to a Grout Gray card base. A large splatter was stamped
several times on the card and the sentiment stamped beneath it. The card was finished
by adhering the letters over the splatter design, making sure to tilt the "U" for fun, and
adding some clear sequins.

Thanks for stopping by and celebrating another year with My Favorite Things. And
remember to use the hashtag #mftstamps whenever you share your MFT projects
on social media.


Tuesday, January 29, 2019

MFT January Hits & Highlights


Falling in love definitely causes a rattle in your heart, so it’s only appropriate that
your love-themed cards feature a shaker heart to honor that feeling. This month, 
we're challenged to create shaker cards featuring hearts — big hearts, mini hearts, 
balloon hearts, and multi-hearts--there are so many options available in the shop!


I chose the new bear from Stacey Yacula and added a heart shaped shaker pouch and
balloon to a simple scene.


I added a bit of texture to the bear with Prismacolor pencils and a tiny jute bow. It's
difficult to see the balloon sentiment, but the recipient will be able to when they shake
the card in person.

Visit today's Hits & Highlights post to see how participating Creative Team members
took on the shaker hearts challenge. Thanks for stopping by today!


Tuesday, October 30, 2018

Hits & Highlights--Merry and Bright


With the Christmas season quickly approaching, the Creative Team was challenged 
to feature products that include “merry” in its name or to add some brightness to
 our projects. We hope you'll be inspired to add some to yours, too!

Here's my take on the challenge.


I ink distressed a panel with several Distress inks then spattered water over
the surface. The bold sentiment was gold embossed over it and the panel was
trimmed and adhered to a top folding white card base.


Our Town was die cut from white card stock and I gold embossed the roofs by
tapping a Versamark pad over the roofs and heat embossing gold powder. The row
of houses was popped up on the card and finished off with gold confetti.

Visit today's Hits & Highlights post at My Favorite Things to see how participating 
team members took on the Merry and Bright Challenge!


Tuesday, June 26, 2018

MFT June Hits & HIghlights--Crazy for Cocktails


For this month's Hits & Highlights, the Creative Team was challenged to create
projects with a cocktail theme.


I was thinking pink, combining the Martini Shaker with a pink flamingo
on a shaker card. After ink distressing the bottom of a watercolor panel,
I spritzed water to create a "fizzy" look, then splashed on watered down pink ink.


The martini was constructed and filled with sequins, then adhered on to
the panel. The sentiment was white embossed and distressed lightly with
gray ink, then trimmed into segments and adhered to the card. I finished off
the card with the flamingo and pink sequins.

Visit the Hits & Highlights post at My Favorite Things to see how the rest of
the Creative Team took on the Crazy for Cocktails challenge!


Tuesday, May 29, 2018

MFT May Hits & HIghlights--Magical May


There’s something magical about May. The transition from spring into summer
and the explosion of color. It seems like the perfect time to bring some magic
into our crafting as well.

This month, the Creative Team is challenged to feature magical creatures or
simply integrate the colors mystical creatures conjure in our imagination.


For my project, I pulled out Birdie Brown's mermaid and gave her "unicorn
colored" hair with Copic markers. I saw this look on Pinterest and thought
it would be fun to give my mermaid rainbow colored hair.

Balloon Strings was clear embossed horizontally on a white card base.
A wave pattern was stenciled on watercolor card stock using the Drifts and
Hills stencil and a circle was cut from it. The mermaid was adhered to the
piece and the sentiment was stamped over it.


I adhered all the pieces to the card and rounded off the right bottom corner.
Clear sequins finished off the card.

Visit today's Hits & Highlights post at My Favorite Things to see how
the rest of the Creative Team took on the Magical May Challenge!


Monday, March 26, 2018

MFT March Hits & Highlights--Pastel Patterned Paper Play


For this month's Hits & Highlights the Creative Team is challenged to use
MFT's collection of pastel patterned papers on our projects.

I usually associate pastels with babies--you too?


I adhered the patterned paper to white card stock, then cut out the scallop
element from Blueprints 1. The little ellie was stamped in gray ink, then
colored with Copic markers and shaded with colored pencils.

I stamped the sentiment, then adhered the elephant who was grounded
with an oval shadow. Another scalloped piece was cut from white card stock
and adhered to the front with a hinge on top so the card can stand on its own.
The finishing touch was a bow borrowed from some bunnies.

 Visit today's post at My Favorite Things to see how the rest of the team
took on the Pastel Patterned Paper challenge!


Monday, February 26, 2018

MFT February Hits & HIghlights--Sentiment Round-Up


This month we're highlighting our collection of Word Circle frames. These frames
can be used for simple layering or combined with Circle Shaker Pouches for extra fun!

Here's my project using the Happy Birthday Circle Frame.


I used the frame as a design element. And I must have had a touch of Olympic
fever when I made this. After die cutting three circles from watercolor card stock,
I painted them in rainbow order with Peerless watercolors and a water brush.

 It's difficult to tell by the photo, but I snipped two circles to link them with the
third in Olympic fashion. The sentiment was white embossed on a strip of black
card stock and adhered to the card. I rounded off the bottom corners and finished
off the card with colorful enamel dots.

Visit today's Hits & Highlights post at My Favorite Things for more inspiration
from the design team using MFT's fun collection of Circle Frames.
Thanks for stopping by today!


Monday, November 27, 2017

MFT November Hits & Highlights


 For this month's Hits & Highlights, we're featuring Birdie Brown's
adorable Bitty Bears. Did you know there are thirteen little fellas in
different poses, holding an assortment of accessories? Just coloring them
makes me smile!


I die cut four Mod Squares from watercolor card stock, ink distressed them
 in four colors of Distress inks, and adhered them to a Grout Gray card
base. I chose four Bitty Bears that were each holding something. I colored
them with Copics and cut them with the matching Die-namics.


Each bear was popped up on a different colored square. The sentiment was
white embossed on a fishtail sentiment strip and adhered between the squares.
The card was finished off with enamel dots.

Visit today's Hits & Highlights post at My Favorite Things to see more
Bitty Bear projects from participating team members. Thanks for stopping by!


Monday, July 31, 2017

MFT July Hits & Highlights


Beginning this month, we are highlighting some of our favorite products in our new 
Hits & Highlights Challenge. Each month we will feature a product, or a collection of 
products, for you to explore. We can't wait to see all the creative ways you use them!

This month it's all about shakers! Whether you’re a master or a novice at crafting
shaker cards, our range of shaker pouches makes it fast and easy to add a variety of
shaped shaker elements to your cards and projects.


I chose to work with the Star Shaker Window and Frame and the Star Pouches
for a super simple shaker card. I love that the shaker pouches are thick enough
to hold a good amount of shaker contents but thin enough that there's no
added bulk to your card.

A watercolor panel was ink distressed with Distress Oxide inks and spattered
with water, then cut with the rectangle element from Blueprints 24. A star
was cut from the inked panel and the Star Frame from Stone Gray card stock.


The new Mermaid Mix Sequins matched perfectly with my inked panel. I added
a few inside of the pouch and assembled and adhered everything to a Stone
Gray card base. The stamped sentiment and sequins finished off the card.

If you've never made a shaker card, now's the time to give it a try with MFT's
shaped shaker pouches. They'll make your life so much easier and shaker cards
are always fun for a recipient of any age!